Peat pellets are a simple and effective way to start cannabis seeds. They provide consistent moisture, stable temperature, and reduce root disturbance during transplanting. Made from compressed sphagnum peat moss, these pellets expand when hydrated, creating an ideal environment for seedlings. Here's what you need to know:
- Why Use Them? They maintain moisture, prevent overwatering, and offer a pH-balanced medium suited for cannabis. Plus, the biodegradable design minimizes transplant shock.
- How to Use Them? Hydrate pellets with warm water, plant seeds about ¼ inch deep, and maintain a temperature of 80–86°F with a humidity dome.
- When to Transplant? Once roots emerge through the mesh and seedlings grow their first true leaves (typically 7–14 days).
- Key Tips: Avoid overwatering, ensure proper airflow, and monitor temperature. Troubleshoot common issues like mold or slow growth early.
Peat pellets are a reliable choice for beginners and small-scale growers, offering ease of use and strong germination rates. While they can be pricier, their benefits often outweigh the cost for high-value cannabis seeds.
🔴 JIFFY 7 ® PEAT PELLET - HOW TO USE AND GROW PLANTS USING THIS GREAT INVENTION!
Step-by-Step Guide to Germinating Cannabis Seeds in Peat Pellets
Start off with the right materials and techniques to ensure successful germination. Using quality genetics from Cannabis Seeds Directory can make all the difference.
Materials Needed
Before diving in, gather the necessary supplies for a smooth germination process. The most important item? High-quality cannabis seeds.
You'll also need peat pellets (like Jiffy Pellets). These are compressed discs of peat moss wrapped in biodegradable mesh, often pre-treated with fertilizer and lime. For example, ZeeDix offers 200 pieces (30mm) for as low as $6.99 on Amazon, with larger packs priced up to $18.99, depending on size and quantity.
Water quality plays a crucial role in germination. Stick to distilled or chlorine-free tap water with a low EC (under 300) or PPM (under 150). Keep the pH neutral at around 7.0, and warm the water to 75–80°F for optimal results.
You'll also need a container or tray to hold the hydrated pellets. While Jiffy pellet trays are a great option, any shallow container will do. A humidity dome or plastic cover is essential to maintain the moist environment seedlings need.
Temperature control is another key factor, so consider using a heat mat with a controller. Additional tools like 320-grit sandpaper for seed scuffing and a plastic fork for making seed holes can also come in handy.
Preparing the Peat Pellets
Place the peat pellets in your tray with the shallow side facing up. Pour warm water over them, allowing them to expand fully. This process usually takes about 10–15 minutes.
Once the pellets have fully expanded, gently squeeze out any excess water. They should feel damp but not overly wet. Use a plastic fork or similar tool to create a small hole - about ¼ inch deep - in the center of each pellet. This depth provides enough coverage while still allowing the seedling to emerge easily. Now you're ready to plant your seeds.
Planting and Caring for Seeds
Drop one seed into each prepared hole, with the pointed end facing downward. Lightly cover the seed with peat moss, but don’t pack it down too tightly, as this could hinder germination.
Set your heat mat to maintain a consistent temperature of 80–86°F (27–30°C) using the controller. Temperature stability is critical, so avoid frequent adjustments that could cause fluctuations.
Cover the tray with a humidity dome, leaving the vents slightly open. The goal is to create a humid environment without making it too stuffy. Check daily to ensure the pellets stay damp but not overly wet.
Under these conditions, most cannabis seeds will germinate within 2–7 days. Once the seedlings begin to emerge, open the humidity dome vents fully to improve air circulation and reduce the risk of damping-off disease. Keep the temperature steady and ensure the pellets remain moist until the seedlings grow their first true leaves and are ready for transplanting.
During this crucial stage, monitor your seedlings carefully. The right balance of temperature, moisture, and airflow encourages strong root growth, laying the foundation for healthy plants throughout their lifecycle.
Best Practices and Troubleshooting Tips
After setting up your germination process, following some key practices and knowing how to troubleshoot common issues can make all the difference in achieving successful sprouting.
Best Practices for Germination Success
- Start with high-quality seeds stored properly. Always use seeds from trusted sources like Cannabis Seeds Directory. Store them in a cool, dark place to maintain their viability.
- Keep environmental conditions steady. Sudden temperature changes can stress seeds and delay germination. Use a reliable thermometer to monitor your heat mat and avoid placing trays near drafts, windows, or vents.
- Moisture matters. Your pellets should feel damp but not overly wet - similar to a wrung-out sponge. Press the surface lightly to check. Overwatering can lead to seed rot or fungal growth.
- Ensure good airflow. Proper ventilation reduces the risk of mold and damping-off disease. Once seedlings emerge, gradually open the vents on your humidity dome and consider using a small fan on low speed for gentle air movement.
- Handle seeds carefully. Minimize handling to avoid damage or contamination. Use clean tweezers or drop seeds directly into their planting spots.
- Label everything. If you're germinating multiple strains, use waterproof markers and plant tags. Different cannabis varieties can have varying germination times, so keeping them organized is crucial.
If problems arise despite these best practices, the troubleshooting tips below can help you address common issues quickly.
Troubleshooting Common Issues
Identifying and resolving germination problems early can save your seeds and seedlings. Here's a quick guide to some frequent challenges and their solutions:
| Problem | Cause | Solution |
|---|---|---|
| No germination after several days | Old seeds, unstable temperatures, or incorrect moisture levels | Check seed freshness, stabilize heat mat temperature, and adjust moisture levels. |
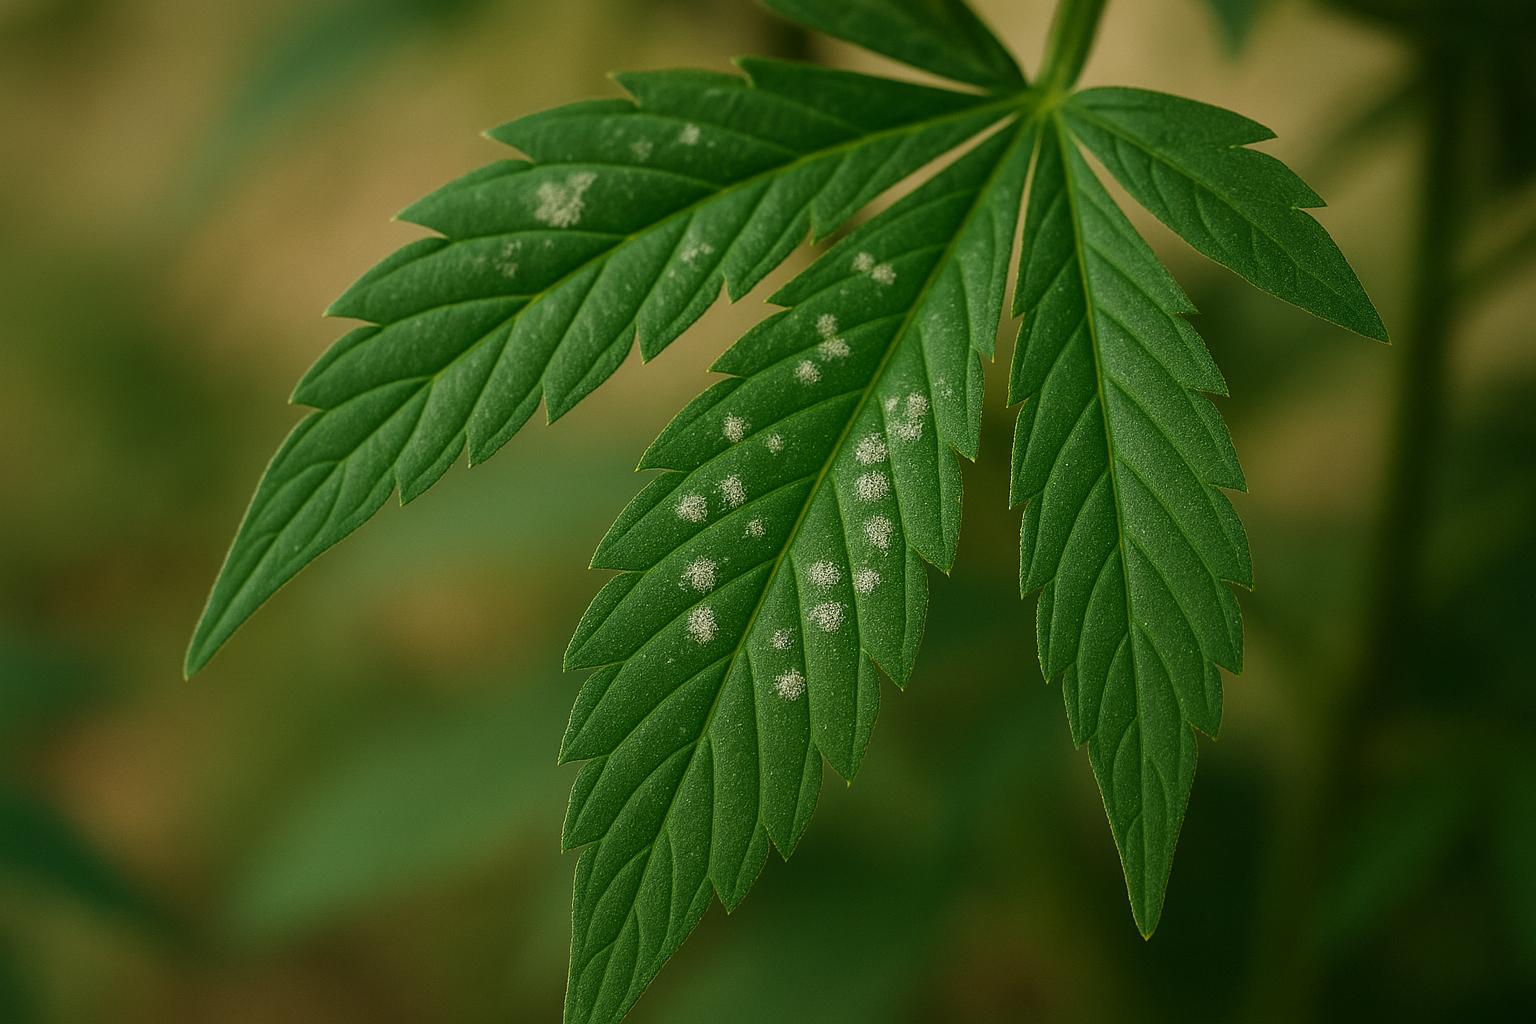
| White fuzzy mold on pellets | Poor airflow or contaminated water | Remove affected pellets, improve ventilation, and water less frequently. |
| Seedlings falling over (damping-off) | Fungal issues due to insufficient airflow | Increase air circulation, reduce humidity, and use a mild fungicide if needed. |
| Seeds sprouting but not breaking the surface | Seeds planted too deep or compacted pellets | Loosen the covering material and ensure seeds are planted at a shallow depth. |
| Yellow or brown seedling leaves | Nutrient burn, light damage, or pH imbalance | Switch to plain peat pellets, check water pH, and adjust light intensity. |
| Slow or weak growth | Poor lighting, low temperatures, or bad seeds | Provide stronger lighting, maintain consistent temperatures, and use viable seeds. |
| Seeds cracking but not sprouting | Low humidity, temperature fluctuations, or seed damage | Stabilize humidity, avoid temperature changes, and inspect seeds for cracks or damage. |
Act fast when issues arise - mold, for example, can spread quickly in warm, humid conditions. Remove any affected pellets immediately and boost airflow to protect healthy seedlings.
To refine your germination process, keep detailed records of each attempt. Note the seed source, planting dates, environmental conditions, and results. This trial-and-error approach will help you improve over time. Remember, some cannabis varieties take longer to germinate, so patience is key. If seeds remain inactive for an extended period, they may simply be non-viable.
sbb-itb-1add288
Transplanting Seedlings from Peat Pellets
After your cannabis seedlings have settled into their peat pellets, knowing when and how to transplant them is key to keeping their growth on track. The great thing about peat pellets is their biodegradable design - you can plant the entire pellet without disturbing the delicate root system. Here's how to determine when it's time to move your seedlings and how to do it right.
When Are Seedlings Ready for Transplant?
You’ll know your seedlings are ready to transplant when you see white roots poking through the mesh, which usually happens within 7–14 days. Another sign is the development of the first set of true leaves - these are the serrated cannabis leaves that appear after the initial round cotyledon leaves. Typically, true leaves emerge about 10–21 days after sprouting, signaling that the plant is ready for more space and nutrients.
Size matters too. Your seedlings should be about 2-3 inches tall with sturdy stems that don’t need extra support. If they look weak or “leggy,” give them a few more days under stronger light before moving them.
Finally, make sure your seedlings are acclimated to their environment. Lower the humidity gradually to help them adjust. This process, known as hardening, ensures a smoother transition to their new home and sets the stage for healthy growth.
How to Transplant Seedlings
Once your seedlings are ready, follow these steps to transplant them without disrupting their roots:
- Prepare your growing medium. Whether you’re using soil, coco coir, or another medium, make sure it’s pre-moistened and at the correct pH. For soil, aim for a pH of 6.0–7.0; for soilless media, 5.5–6.5 works best. Fill your container so the top of the pellet will sit flush with the surface.
- Handle the mesh netting carefully. Leave the biodegradable mesh intact unless it’s restricting root growth. If needed, make a few small vertical cuts with clean scissors, but avoid removing the netting entirely to protect the roots.
- Create a planting hole. Gently press into the growing medium to make a hole slightly larger than the peat pellet. The hole should be deep enough so the top of the pellet sits level with the surface - burying it too deeply can cause stem rot.
- Position and plant. Lift the peat pellet gently, place it in the hole, and ensure it fits snugly without compressing it. Lightly firm the surrounding medium, but don’t compact it.
- Water immediately. Use room-temperature water and pour it slowly around the base of the seedling to moisten the pellet and surrounding medium evenly. Be careful not to overwater; the goal is consistent moisture, not soggy conditions.
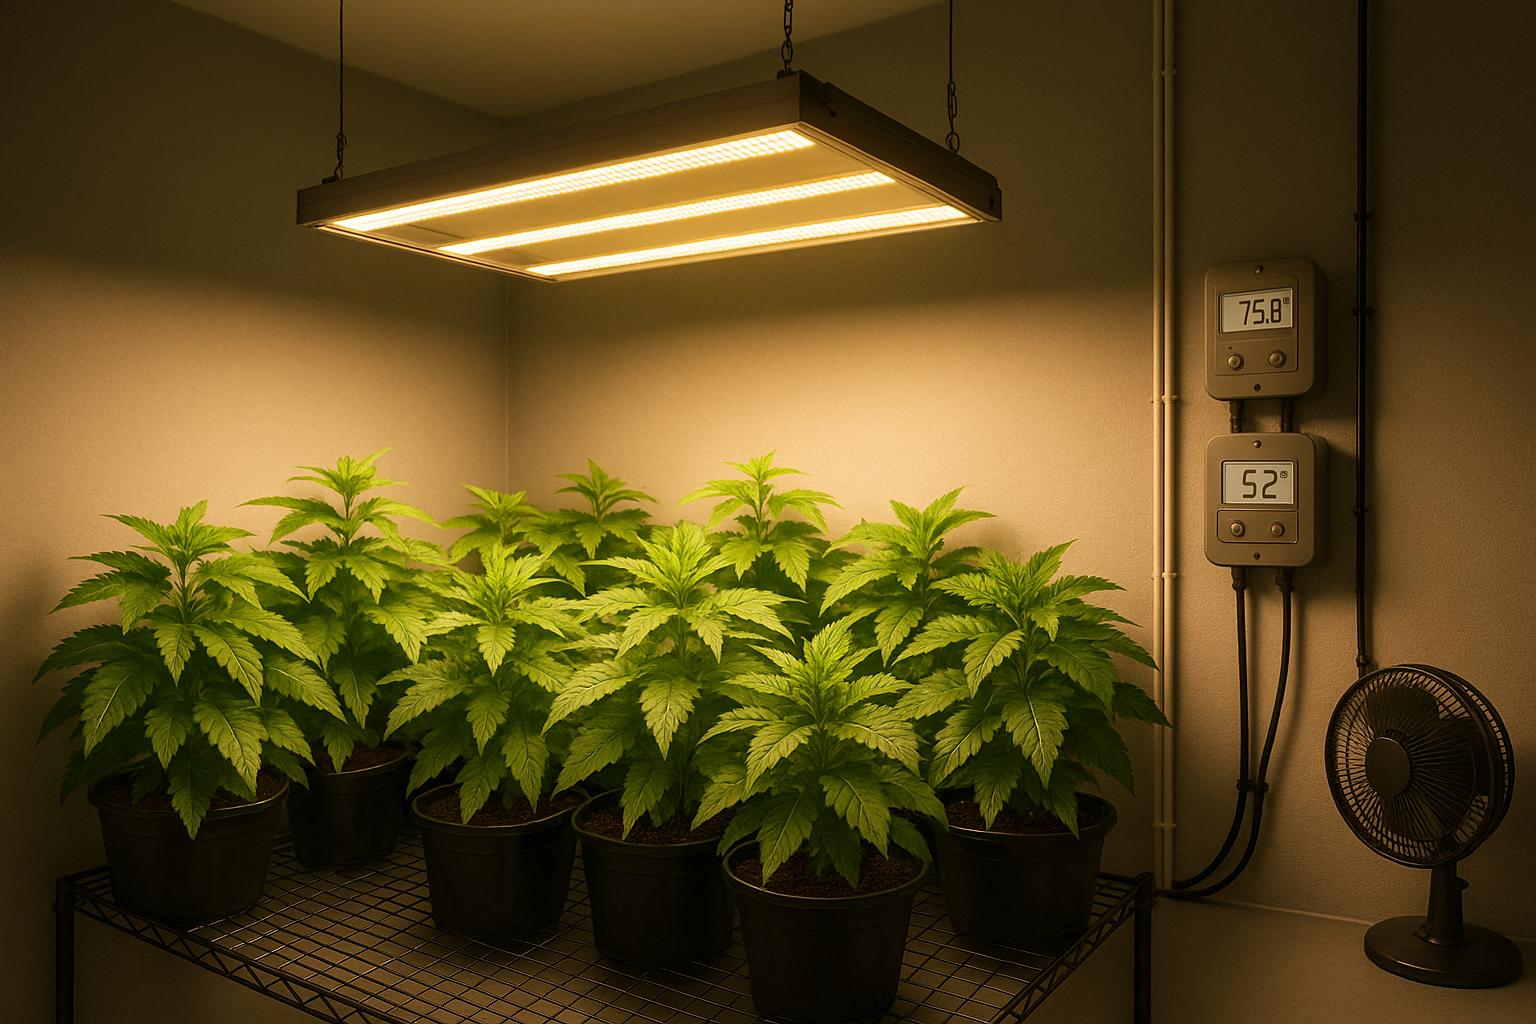
- Monitor the environment. For the first week, keep the temperature between 70–75°F and humidity around 60–65%. Use gentle lighting, such as LED lights positioned 18–24 inches above, to avoid stressing the seedlings.
Within a few days, you should notice signs of successful transplanting, like new leaf growth and steady upward development. If you see yellowing leaves or drooping that lasts more than 48 hours, adjust your watering or environmental conditions.
Peat pellets will naturally break down within 4–8 weeks, depending on moisture levels and soil activity. During this time, the roots will grow through and around the pellet, fully establishing themselves in the new medium.
Pros and Cons of Peat Pellet Germination
Peat pellets come with their own set of perks and challenges when used for cannabis cultivation.
One standout advantage is their convenience. They provide a controlled environment with consistent moisture levels and a sterile medium, making them an easy choice for germinating seeds. Plus, their design allows you to plant the entire pellet directly into the soil without disturbing the roots. This feature helps reduce transplant shock, making the process smoother for your plants.
On the flip side, peat pellets can be more expensive than basic germination methods - a key consideration for large-scale growers. There's also the issue of sustainability. Harvesting peat can harm wetland ecosystems, so it's essential to look for products that are responsibly sourced.
Comparison Table: Pros and Cons
| Advantages | Limitations |
|---|---|
| High germination success rates | Higher cost compared to other methods |
| Minimizes transplant shock | Risk of overwatering in humid environments |
| Pre-sterilized to prevent contamination | Environmental concerns tied to peat harvesting |
| Retains moisture effectively | Limited nutrients for extended growth periods |
| Easy to handle and store | Can become compacted if overwatered |
| Biodegradable mesh reduces root disturbance | Requires close attention to pH levels |
| Compact size saves space | Not reusable after use |
| Built-in drainage reduces root rot risk | May dry out quickly in low-humidity conditions |
While peat pellets may cost more upfront, they save time and reduce transplant stress, making them a worthwhile investment - particularly for growers working with high-value cannabis strains.
For beginners, peat pellets are an excellent choice due to their ease of use and reliability. However, seasoned growers managing larger-scale operations might lean toward more traditional, cost-effective methods.
Ultimately, the decision comes down to balancing the convenience and success rates of peat pellets against their price and environmental footprint to find the best fit for your growing needs.
Conclusion
Using peat pellets for germinating cannabis seeds offers a dependable and straightforward approach that combines ease of use with excellent results. These pellets provide consistent moisture levels and a sterile environment, which are key factors in achieving high germination rates.
To ensure success, it's crucial to expand the pellets with room-temperature water, maintain a temperature range of 70–75°F, and keep humidity levels optimal. Regularly check moisture levels, but avoid overwatering to prevent issues like root rot or damping-off.
One standout feature of peat pellets is their effortless transplant process. The biodegradable mesh allows you to move seedlings without disturbing their roots, significantly reducing the risk of transplant shock.
While the initial cost of peat pellets may be higher than traditional methods, the benefits often outweigh the expense. Their ability to save time and reduce plant loss makes them especially appealing for growers working with high-value cannabis genetics. The controlled environment they create ensures that even the most expensive seeds have the best chance to thrive.
For beginners, peat pellets simplify the germination process by removing much of the uncertainty. The pre-sterilized medium and built-in drainage system create a forgiving setup that can still deliver excellent results, even with minor errors.
Whether you're growing a few plants at home or managing a larger operation, peat pellets offer the consistency and reliability needed to nurture quality cannabis seeds into strong, healthy seedlings ready for the next stage of growth. With the right setup, careful attention, and timely transplanting, peat pellets can become an essential part of your cultivation toolkit.
FAQs
What environmental issues come with using peat pellets for cannabis germination, and are there eco-friendly alternatives?
Harvesting peat for pellets poses serious ecological issues. It disrupts delicate ecosystems and depletes a resource that takes hundreds of years to regenerate. On top of that, many peat pellets are wrapped in plastic mesh that doesn’t decompose, adding to the growing problem of plastic waste.
For a more eco-friendly approach, try alternatives like coconut coir, compost, rice hulls, or wood fiber. These options are renewable, biodegradable, and gentler on the environment, all while offering excellent support for seed germination.
How can I avoid issues like mold or damping-off when germinating cannabis seeds in peat pellets?
To keep mold at bay while germinating cannabis seeds in peat pellets, focus on managing moisture levels carefully. Instead of soaking the pellets, use a spray bottle to lightly mist them. Too much water creates the perfect environment for mold to thrive. Also, make sure the pellets are spaced out to allow good airflow, and always use clean tools and containers to reduce the chances of contamination.
To prevent damping-off, opt for a sterile seed-starting mix. A combination of peat moss with vermiculite or perlite works well, as it improves drainage. Keep the humidity balanced - moist but not overly wet - and ensure there’s plenty of ventilation. Following these steps will give your seeds the best chance to sprout without running into fungal problems.
How can I successfully transplant seedlings from peat pellets to their final growing medium?
To transplant seedlings from peat pellets without a hitch, start by carefully removing any netting or mesh surrounding the pellet, if it’s there. Then, place the entire pellet directly into your chosen growing medium, making sure the top of the pellet sits flush with the soil surface. Be gentle with the seedlings to avoid harming their delicate roots.
After transplanting, keep the soil evenly moist - just damp enough without becoming soggy. If you notice any part of the pellet sticking out, cover it entirely with soil to encourage healthy root growth and minimize the risk of transplant shock. With the right care, your plants will settle in well and keep growing strong.