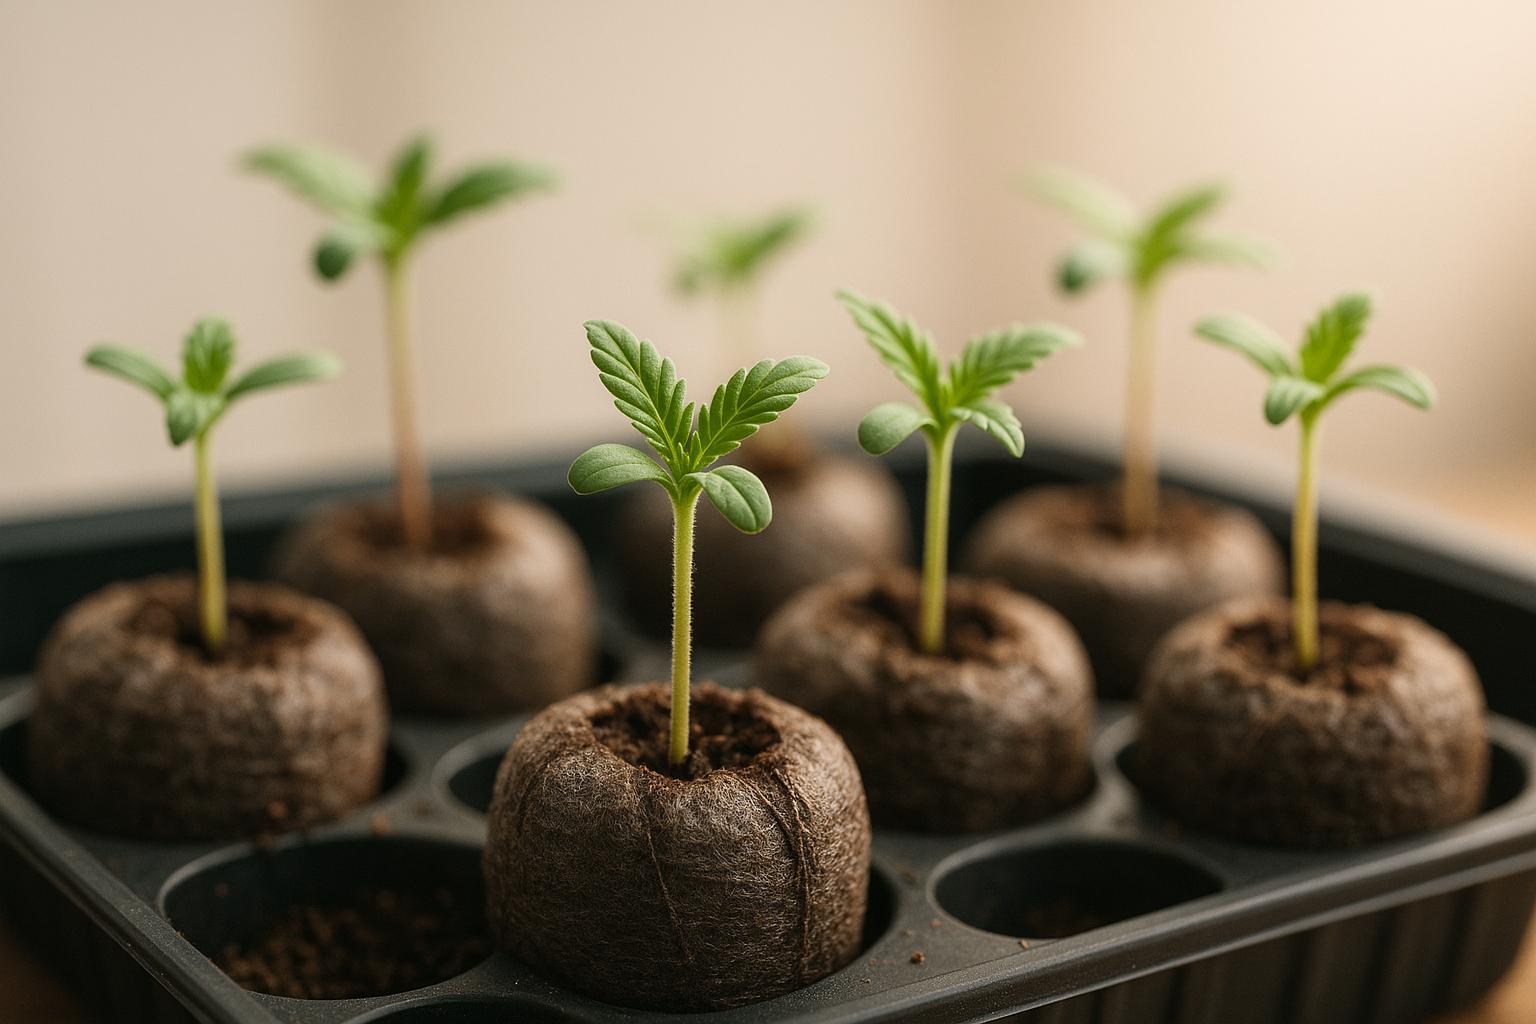
- Start with quality seeds: Choose seeds from trusted breeders to ensure reliable genetics. Feminized seeds are ideal for phenotype selection.
- Create a controlled grow space: Maintain stable light, temperature (70–78°F), humidity (60–70% veg, 40–50% flower), and airflow to let each plant express its traits.
- Track vegetative growth: Observe plant vigor, stem strength, leaf structure, branching, and stress response. Keep detailed notes and photos for comparison.
- Monitor flowering traits: Evaluate bud density, trichome production, aroma, flowering speed, and stress resistance. Look for plants with standout qualities.
- Harvest, cure, and test: Process plants individually, cure properly, and test for potency, flavor, and effects. This ensures accurate evaluation.
Key takeaway: The best phenotype balances yield, potency, and desired traits. Document everything and preserve top picks through cloning to secure consistent results for future grows.
Phenotype Profiling for Cannabis
Step 1: Get Quality Seeds and Set Up Your Growing Space
To truly uncover the unique traits of your plants, you need high-quality seeds and a well-controlled environment. Let’s start by sourcing the right seeds.
Finding Seeds from Trusted Breeders
Reputable breeders take the time to stabilize their strains, ensuring that distinct traits consistently show up across multiple plants from the same seed pack. Poor genetics, on the other hand, can lead to wildly inconsistent plants, making it nearly impossible to compare and identify standout phenotypes.
When shopping for seeds, look for breeders who provide detailed strain information, including lineage, flowering times, and expected yields. Top breeders often offer germination guarantees and maintain strict quality control, which is essential when you’re committing months of effort to a phenotype hunt.
Check resources like Cannabis Seeds Directory to find trusted genetics. Starting with reliable seeds increases your chances of discovering keeper phenotypes.
For a good balance of variety and manageability, order 10–15 seeds of the same strain. Feminized seeds are a smart choice for phenotype selection since you won’t need to worry about male plants taking up valuable space.
Setting Up Proper Growing Conditions
Once you’ve secured quality seeds, it’s time to create an environment where each plant can fully express its genetic potential. Controlled conditions are key to highlighting phenotypic differences. Without consistency, environmental factors can overshadow or distort the plants' natural traits.
Temperature control is the most critical element. Aim for daytime temperatures between 70–78°F, with nighttime temperatures 5–10°F cooler. Large temperature swings can stress plants and alter how traits are expressed. Use a thermometer with min/max tracking to monitor stability.
Humidity is another important factor. During the vegetative stage, keep humidity levels between 60–70%. Once the plants enter the flowering stage, lower it to 40–50% to prevent mold while supporting healthy growth.
Lighting should be evenly distributed across all plants. Whether you’re using LED, HPS, or another type of grow light, ensure they’re positioned to provide uniform coverage. Uneven lighting can create artificial differences that aren’t genetic. If possible, use a PAR meter to measure light intensity and aim for 400–600 PPFD during the vegetative stage.
Airflow is just as crucial. Use oscillating fans to maintain gentle, consistent air movement throughout your grow space. This not only strengthens plant stems but also helps prevent pests and diseases.
When it comes to nutrients, mix a single solution for all plants and stick to a proven feeding schedule. This ensures that any differences you observe are due to genetics, not variations in feeding.
Finally, space your plants evenly. Crowding can distort growth patterns, making compact plants appear stretched or causing bushy plants to grow poorly. Giving each plant enough room allows their natural growth habits to shine.
Keep a daily log of environmental conditions to catch any external factors that might impact your results. Consistency is your best ally in identifying the true potential of your plants.
Step 2: Track and Record Vegetative Growth
The vegetative stage is where your plants start to show their true potential. This is the time to spot early standouts before committing months to flowering. Typically lasting 4–8 weeks, this phase reveals key differences in how each plant grows, building on the foundation of quality seeds and controlled conditions.
What to Look for During Vegetative Growth
Start by observing growth vigor, which often separates the best plants from the rest. Some phenotypes grow rapidly, adding several inches weekly, while others take their time. Fast growth can mean higher yields, but don’t count out slower plants - they might surprise you with dense buds or strong potency later on.
Check stem thickness and strength as well. Plants with thick, sturdy stems are better equipped to support heavy flowers without extra support. Gently squeezing the main stem can give you clues - look for a solid, firm feel rather than something hollow or weak. Strong stems also suggest efficient nutrient transport.
Leaf structure offers insights into a plant’s genetics. Sativa-dominant plants usually have narrow, elongated leaves, while indica-leaning ones tend to have broader, wider leaves. Hybrids might display unique leaf shapes that don’t fit neatly into either category. Healthy leaves are deep green and glossy, indicating good chlorophyll production.
Pay attention to branching patterns. Some plants grow with a dominant central cola, forming a Christmas tree shape, while others branch out horizontally, creating a bushier look. Both styles have their advantages depending on your growing setup. Plants with strong lateral branching often respond well to training techniques like SCROG (Screen of Green).
Monitor how plants handle stress and environmental shifts. The best phenotypes recover quickly from minor issues like nutrient deficiencies or temperature changes. Resilient plants during this phase are more likely to stay strong through flowering.
Lastly, evaluate internodal spacing. Plants with tight spacing between nodes (1–2 inches apart) are more likely to produce dense buds. In contrast, those with wider spacing might yield airier flowers.
How to Label and Document Your Plants
Start by assigning a number to each plant before germination. Use waterproof tags with simple labels like "Strain Name #1" or "Strain Name #2." Avoid overcomplicating things - keep it straightforward. Place tags at soil level where they’re easy to see but won’t interfere with the plant’s growth.
Keep a grow journal from the very beginning. Whether it’s a notebook, a spreadsheet, or a smartphone app, make sure to log key milestones like germination and transplant dates. Digital tools can also make it easier to add photos and search through your records later.
Take weekly photos and measurements of each plant from the same angle and distance. This creates a visual timeline that highlights growth patterns you might not notice day-to-day. For reference, include a ruler or coin in your photos. Record details like height, stem diameter (measured 2 inches above the soil), and the number of nodes to objectively compare plants.
Write down your observations in plain language. For example, note things like "Plant #3 is growing the fastest" or "Plant #7 has the thickest stems." These informal notes often provide more clarity than precise measurements when it comes time to make decisions.
Track problems and solutions for individual plants. If Plant #5 recovers quickly from nutrient burn while Plant #2 struggles, that’s a key detail about stress tolerance. Record the dates and details of any issues - this information will be crucial when evaluating plants later.
Use a simple rating system for subjective traits. Score each plant on a scale of 1–5 for characteristics like vigor, structural strength, and overall appearance. These ratings can help you narrow down your choices when comparing multiple plants.
Consistency is key. Stick to a straightforward documentation system rather than an overly complicated one that might be hard to maintain. A few clear notes and photos will be far more useful than an elaborate system you abandon halfway through.
Step 3: Check Pre-Flowering and Flowering Traits
As your plants transition from vegetative growth to flowering, this stage reveals distinct traits that help identify the top-performing phenotypes. Typically, this shift begins when you switch to a 12/12 light cycle (12 hours of light and 12 hours of darkness) and lasts 8–12 weeks, depending on the strain. Keeping detailed records from the vegetative phase will make it easier to evaluate these new characteristics.
Pre-Flowering Signs to Watch
Branching structure becomes a key focus as the plants gear up for flower production. Look for well-spaced lateral branches that support higher yields. The most promising plants will display balanced growth between the main cola and side branches, forming an even canopy.
Root development, though often overlooked, is crucial for flowering success. If you’re growing in containers, check the pot’s weight to get a sense of root health. Plants with strong, extensive root systems are better equipped to absorb nutrients during this demanding phase.
Stretch patterns during the first 2–3 weeks of flowering can highlight standout phenotypes. Most plants will double or triple in height, but the best ones stretch in a controlled way while maintaining tight internodal spacing. Watch out for excessive stretching (more than a 300% increase), which can lead to weak stems and airy buds. On the flip side, minimal stretch might indicate low vigor.
Sex expression timing is another important factor. Female plants that reveal their sex quickly - within 7–10 days of the light cycle change - tend to flower faster and more uniformly. Late-blooming females may take longer to mature or produce inconsistent results.
Pre-flower cluster formation offers an early glimpse of bud structure. Check where the first clusters appear along the branches. Dense, tight clusters at multiple nodes usually indicate the potential for compact, resin-rich buds. These early signs lay the groundwork for evaluating the flowering traits that follow.
Key Flowering Features
Terpene development starts to stand out around weeks 3–4 of flowering and intensifies as the buds mature. Rubbing a leaf can help you assess terpene intensity. Plants with the strongest aroma at this stage often retain their scent through harvest and curing, so pick phenotypes that match your preferred aroma profiles.
Trichome production begins early but becomes more pronounced between weeks 4–6. Use a jeweler’s loupe or magnifying glass to inspect the resin glands on the buds and nearby leaves. The best phenotypes will have dense trichome coverage that extends beyond the flower sites to surrounding fan leaves.
Bud structure can vary widely, even among plants of the same strain. Dense, tightly packed buds are often preferred for their visual appeal and ease of storage. Some growers, however, favor moderately dense buds, which dry and cure more evenly, reducing the risk of mold. Loose, airy buds are less desirable unless they offer exceptional potency or unique terpene profiles.
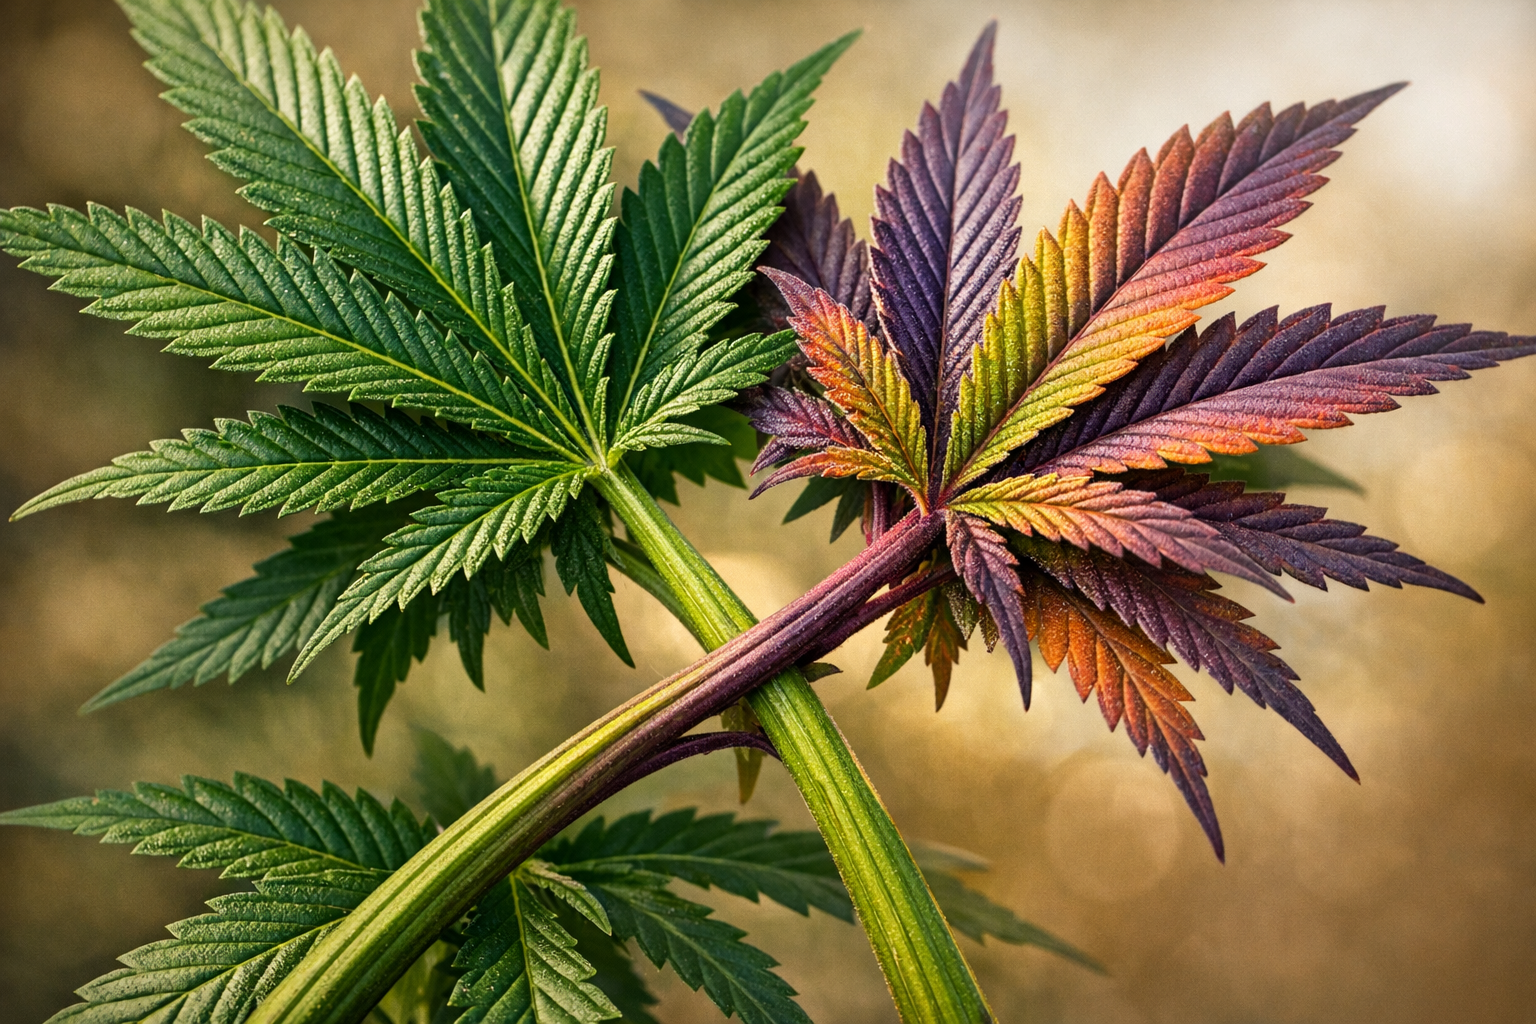
Color expressions may emerge in the final weeks of flowering, particularly if nighttime temperatures dip below 65°F (18°C). Shades of purple, pink, or red can add visual interest, but don’t let color distract you from more important traits like potency and yield.
Flowering speed is another critical factor. Fast-maturing phenotypes (7–8 weeks) allow for more harvests in a year, while slower ones (10–12 weeks) might reward you with larger yields or higher potency. Track each plant’s progress weekly, especially when trichomes begin shifting from clear to milky.
Stress resistance becomes vital during this phase, as flowering plants are more vulnerable to environmental changes. Consistent conditions, as emphasized in Step 1, help you assess how each phenotype handles stressors like temperature shifts, humidity fluctuations, and nutrient imbalances. Plants that show early signs of stress - such as yellowing leaves or stunted buds - may not be worth keeping for future grows.
Calyx-to-leaf ratio directly impacts yield and trimming efficiency. Plants with large, swollen calyxes and minimal leaf growth produce buds that are easier to process and more visually appealing. Check the number of sugar leaves protruding from each bud - fewer leaves generally mean less post-harvest work and a cleaner final product.
sbb-itb-1add288
Step 4: Harvest, Cure, and Test Each Plant
After weeks of careful monitoring during the flowering stage, the moment of harvest is a pivotal step in selecting the best phenotypes. What happens after you cut the plants is just as important as the growing process itself. To ensure accurate evaluation, handle each phenotype separately during drying, curing, and testing. This step connects the cultivation phase to the final selection, where the true potential of each plant is revealed.
When it’s time to harvest, use a jeweler's loupe to check the trichomes. Aim for 70–80% milky trichomes and 10–20% amber ones - this is typically when the plant is at its peak. Keep in mind that even within the same strain, different phenotypes may ripen on slightly different schedules.
To avoid confusion, process each plant individually and label everything using the numbering system you’ve established. Organization is key - mixing up samples at this stage could undo weeks of careful observation.
Why Curing Makes All the Difference
Curing is where your hard work pays off, transforming freshly dried cannabis into a product that highlights the unique traits of each phenotype. This process enhances terpene profiles, breaks down chlorophyll, and smooths out harsh flavors, allowing the plant’s true qualities to shine.
Drying should take 7–14 days in a controlled environment. Keep the temperature between 60–70°F (15–21°C) and the humidity around 50–60%. While faster drying might seem tempting, it can damage terpenes and result in harsh smoke, making it harder to evaluate the plant accurately. Each phenotype may dry at a slightly different pace depending on its bud density and moisture levels.
Curing demands patience. Once dried, place the buds in airtight glass jars, filling them about 75% to leave room for airflow. During the first week, open the jars daily for 10–15 minutes to release moisture (a process called “burping”). After that, burp the jars 2–3 times a week for the next month. This step brings out the flavors and smoothness, with some phenotypes developing sweet or earthy notes as they cure.
Keep an eye on the moisture content, which should stabilize at 58–62% relative humidity inside the jars. Small hygrometers are handy for monitoring each jar, as different phenotypes may retain moisture differently. Dense buds often take longer to cure than airy ones, so adjust your timeline accordingly.
Testing for Potency, Flavor, and Effects
After curing for at least 2–3 weeks, it’s time to test each phenotype. This phase helps you identify which plants meet your goals for potency, flavor, and effects.
Set up a testing schedule to ensure fair comparisons. Test one phenotype at a time, leaving 2–3 hours between sessions to reset your senses. Consistency is key - try to test in the same environment and at the same time of day for reliable results.
Start small when sampling. A single hit from a clean pipe or vaporizer is enough to gauge potency and initial effects. Some phenotypes may act quickly, while others take 10–15 minutes to kick in. These differences often reflect unique cannabinoid and terpene profiles, so take note.
Track physical effects such as relaxation, energy boosts, or potential medicinal benefits like pain relief or improved sleep. Use a simple 1–10 scale to rate each effect, making it easier to compare phenotypes later. Be sure to document any negative effects, like dry mouth or anxiety, as well.
Flavor and aroma testing becomes more precise after proper curing. Pay attention to the initial taste, how it evolves during use, and the aftertaste. Some phenotypes might start fruity and finish earthy, while others maintain a consistent flavor profile. Also, note the smoothness of the smoke or vapor, as this can vary widely.
Potency evaluation is about more than just strength. Consider how much material you need to achieve the desired effects. A phenotype requiring larger amounts might not be worth keeping unless it offers something exceptional, like unique flavors or other standout traits. Also, think about how long the effects last - some phenotypes deliver a short but intense experience, while others provide moderate effects that linger.
Consistency matters. Test each phenotype multiple times over several days to see if it delivers predictable results. Unstable effects might indicate issues with genetics or curing, making those phenotypes less reliable for future cultivation.
Finally, compare the yield quality alongside potency and effects. Measure the usable yield after trimming, accounting for factors like excessive stem weight or loose bud structure. High-quality trim with resinous sugar leaves can also be a bonus, providing material for extracts or edibles.
Step 5: Choose and Save the Best Phenotypes
After testing, it’s time to use your documented data to pick the standout phenotypes that will shape your garden's future. The goal is to strike a balance between potency, yield, and consistency. For instance, a plant with incredible potency but poor yield isn’t practical, while one with high yield but lackluster effects might leave you underwhelmed. The best phenotypes usually perform well across multiple areas without any glaring weaknesses. Using the notes you’ve taken throughout the growth, flowering, and testing stages, you can now narrow down your options. This decision sets the stage for both your current grow and your long-term strategy.
How to Pick Keeper Phenotypes
Start by reviewing your notes and test results to get a full picture of each plant's performance. This step often reveals patterns that might not have been obvious during individual evaluations.
- Growth vigor and resilience: Look for plants that grew robustly and bounced back quickly from stress. Strong genetics like this save time and reduce risks.
- Yield quality over quantity: A plant that produces 4 ounces of dense, resinous buds is often more valuable than one with 6 ounces of airy, low-potency material. Focus on the usable yield - the premium buds after trimming - while factoring in the quality of the trim for extracts.
- Flowering time: Shorter flowering times can lower electricity costs, but don’t sacrifice other important traits just to save a week.
- Potency and effects: Match the plant’s cannabinoid and terpene profile to your goals. Whether you prioritize CBD for medical use or THC for recreational purposes, choose a phenotype that delivers consistent and desirable effects.
- Flavor and aroma: Consider the terpene profile and how it evolves during use. Pick something you’ll enjoy regularly, not just what impresses during testing.
- Structural traits: Plants with a good bud-to-leaf ratio are easier to trim and more visually appealing. Strong branches and controlled stretch make growing simpler, especially in limited spaces.
- Consistency: Reliable results across multiple tests indicate stable genetics. Avoid phenotypes with unpredictable potency or effects.
Cloning and Saving Genetics
Once you’ve identified your top phenotypes, preserving their genetics is crucial. Cannabis plants have a limited window for cloning, so act quickly to avoid losing months of work.
- Timing matters: Take cuttings when plants are about 70% through flowering. If you miss this window, you can try to "reveg" the plant by leaving some lower branches with small buds and switching back to an 18/6 light schedule.
- Prepare your cloning setup: Have everything ready - humidity dome, rooting medium (like rockwool or peat pellets), rooting hormone, and gentle lighting. Avoid intense lights that might stress cuttings.
- Select healthy cuttings: Use mid-section branches, avoiding soft tips and woody bases. Each cutting should be 4-6 inches long with 3-4 nodes. Take multiple cuttings to ensure success, aiming for a 60-70% rooting rate.
- Use proper technique: Make a clean 45-degree cut below a node and immediately place the cutting in water to prevent air bubbles. Trim large fan leaves in half to reduce water loss while maintaining photosynthesis.
- Create the right environment: Keep temperatures between 75-80°F (24-27°C) and humidity at 80-90% under the dome. Roots typically appear within 7-14 days.
- Label everything: Use the same numbering system from your notes and include the date and details about the mother plant. Clear labeling prevents mix-ups.
Maintaining Your Genetics
After clones are established, designate one as a mother plant to preserve the genetics for future use. Keep the mother in vegetative growth under 18-24 hours of light daily, and regularly prune and feed her to maintain health and productivity.
- Backup your genetics: To safeguard against loss, take cuttings from your best clones and maintain multiple generations. Some growers keep mothers from their top 2-3 phenotypes for added security.
- Short-term storage: If you’re not ready to root cuttings immediately, wrap them in damp paper towels, seal them in plastic bags, and store them in the refrigerator for 1-2 weeks. Fresh cuttings, however, root more reliably.
These carefully preserved genetics will serve as the cornerstone for your future grows, ensuring consistent and high-quality results cycle after cycle.
Conclusion: Getting Better at Phenotype Selection
Improving at phenotype selection takes time, persistence, and a structured approach. The five key steps - from sourcing top-tier genetics to preserving standout plants - lay the groundwork for thriving cannabis cultivation. Over time, practice refines these skills, making each cycle more effective than the last.
A critical part of this journey is systematic documentation. Keeping detailed records transforms observations into actionable insights, allowing growers to build on past successes. Professional cultivators often stress that consistent results come from a combination of experience, keen observation, and thorough documentation.
Starting with quality genetics is non-negotiable. Trusted breeders, such as those highlighted by Cannabis Seeds Directory, provide the reliable starting material necessary for successful phenotype selection. Each seed carries its own unique genetic blueprint, offering a wide range of traits. This diversity is what makes phenotype hunting so rewarding - you’re uncovering those rare gems that stand out from the rest.
To ensure your findings are truly genetic and not influenced by external factors, maintaining stable growing conditions is essential. Controlled environments, paired with clear selection criteria that go beyond the basics, help identify plants with traits perfectly suited to your goals and growing setup.
The process of phenotype selection can be broken into three phases: initial agronomic screening, testing genetic stability through multiple grow cycles, and final selection using detailed evaluation methods. This step-by-step framework allows growers to refine their choices and improve specific traits over time. With each generation, there’s an opportunity to fine-tune selections and move closer to achieving your vision.
FAQs
How can I make sure the cannabis seeds I buy are from a reliable breeder with stable genetics?
When buying cannabis seeds, it’s essential to choose a breeder with a solid reputation for quality and reliable genetics. The best breeders are those who have a history of careful testing, selective breeding, and open, transparent practices aimed at delivering stable and dependable strains.
Stick with breeders known for consistently delivering well-documented strains that growers trust. Take time to read reviews, check feedback from other cultivators, and look into how transparent the breeder is about their methods. Choosing breeders with a proven track record and a strong focus on genetic stability can make all the difference in ensuring success with your home grow.
What mistakes should I avoid when setting up a grow space for phenotype selection?
When setting up a controlled grow space for phenotype selection, there are a few common missteps that can derail your efforts. Issues like poor ventilation, insufficient lighting, and fluctuating temperatures can put unnecessary stress on your plants, stunting their growth and development. Keeping the environment stable is key to ensuring plants thrive.
Another frequent error is not accounting for the space plants truly need. Overcrowding can block airflow and reduce light exposure, both of which are crucial for healthy growth. On top of that, neglecting to incorporate essential systems - like humidity regulation, nutrient delivery, and pest control - can throw off the delicate balance required for proper phenotype evaluation. By carefully planning and fine-tuning your grow space, you’ll set yourself up for success and more accurate results.
What’s the best way to document and compare cannabis phenotypes for future cultivation?
To thoroughly document and compare cannabis phenotypes, it's essential to maintain a detailed grow journal. This journal should track traits such as plant size, growth habits, bud structure, aroma, potency, yield, flowering time, and trichome production. Keeping conditions consistent - like light, temperature, and humidity - is crucial to ensure any differences observed are due to genetics rather than environmental factors.
Include both photos and detailed notes to capture the key stages of the growth cycle. You might also find it helpful to rate each phenotype based on your specific goals, such as flavor, potency, or ease of cultivation. Taking an organized approach like this not only helps you identify standout plants but also makes it easier to replicate their success in future grows.